Photo Restoration

One of the many things I am asked to do is photo restoration. It is something that I always feel privileged to do as I am restoring a special moment in time that was captured on film either in a photographic print or a film slide and occasionally a digital image that has then become sadly damaged. I am often described as performing magic and it’s always so satisfying to bring an image back to the original and even improve an original image.
I start the restoration process by scanning the damaged original photograph using a high resolution scanner. I usually save the image in a TIFF format which means that it creates a much bigger digital image, it allows multiple layers as well to be saved within one image, which is perfect for how I do restoration work using either Photoshop or Affinity Photo software on my iMac. It also means that I increase the image size on my monitor without losing any quality or creating pixelation.
Once I have scanned the photograph, I open up the editing software on my iMac. I import the image and then make a copy of the image prior to any editing that takes place, this means that I’m editing on the copy not the original import. I usually label this layer 1.

This photo was a large format photograph and too big for my scanner so I had to scan this in, in two parts, it was also damaged so had to be careful whilst scanning not to damage it further.
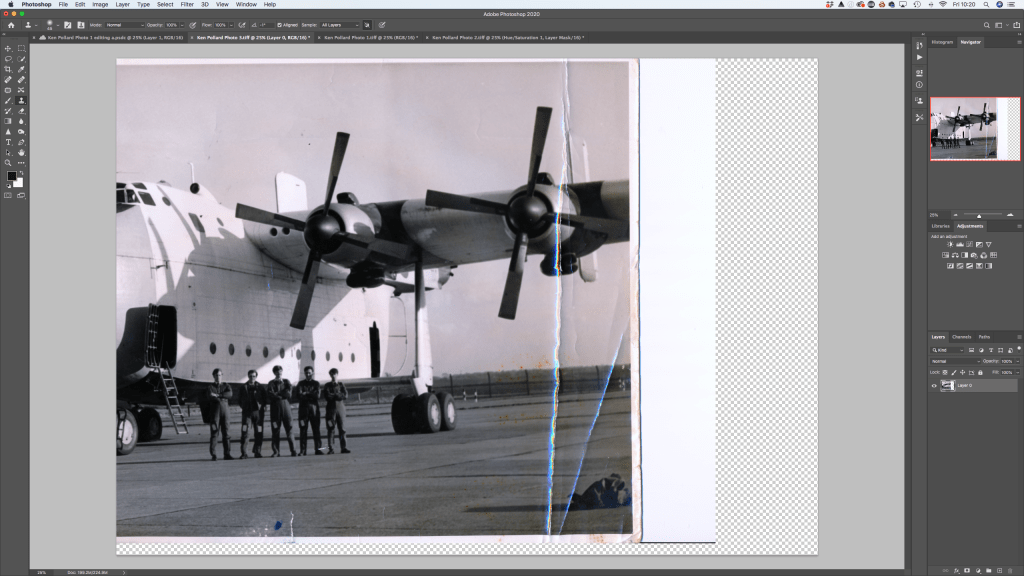
I have now scanned the second part of this image together. As you can see it has some very bad creases and although the image is in black and white, in order to get the higher quality, I have scanned this using the colour option which allows me to work in billions of pixels rather than just thousands. The two images look like they have a peach tint in the first one and in the second almost a purple tint. The first part of the restoration process involves me merging the two images together seamlessly.

So I have put the two images together, but as you can see they don’t quite match up yet, I have to align them just so that they seamlessly connect. I am working with layers so I can easily align this image by adjusting either layer 1 or layer 2 using the Move tool in Photoshop. The other thing that I had to do was make the Canvas size bigger to accommodate the image and not accidently cut off the merged images anywhere which could happen when you are moving and dragging images to merge into one. You simply adjust the width and height accordingly to ensure the whole of the merged image is in the right place. This is done by going to the menu at the top of your Photoshop workspace and clicking on “Image”, there will be a drop down menu and you simply click on “Canvas size”.

All you do in this box is increase the width and height of the current canvas until it gets the whole of the image. Once you have achieved this, you will have an image that needs restoration and converting to black and white.

Top tip here for the more beady eyed of you out there, you may have noticed that my combined image now looks a little different not just because I have increased the canvas size but because I have changed how the layers stack on each other which allows me a little less editing.
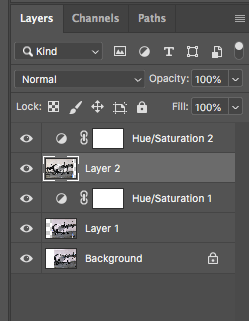
The first thing I do when dealing with an image especially 2 images that have been merged together as these have and they are originally black and white is to match the black and white tones giving a uniform tone throughout the merged image. This is done simply by adding an adjustment layer to each layer using the Hue/Saturation option. All you simply do is just take the saturation option and drag the slider to -100 on both layers and you will then have a perfect black and white toned photo.

With the colour tone corrected you are now able to work on the restoration itself. I use a range of tools, including the Clone Stamp tool, Spot Healing Brush, Patch Tool and the Content Aware Move tool. In order to edit and restore imperfections properly, make sure that you have either layer 1 or layer 2 selected.
With the correct layer selected you can then use the different tools to restore the image. Take your time to use the right tool. If you aren’t sure which tool to use, simply hover your mouse over the tool and you will get an information box up which will describe and show you how the tool works.
The great thing about using layers, is you can click on the Eye Icon to hide or show the layer to help you keep up with the changes to the image.

Once you have made all changes, the magic of photo restoration is revealed. Please see below for the completed image.

I hope that this has given you a bit of insight into what’s involved in restoring images. If you have an image that you’d like restored then please get in touch.

